GTA Vice City stories sure bring up a nostalgic factor for many, as it was one of the few games that allowed users to enter cheat codes. Whether be it summing a tank, wreaking havoc in the city, or making the female NPC characters go crazy around you, GTA Vice City surely remains the developer’s most beloved series. Check out the best cheat codes available for this po…
Source link
Blog
-

GTA Vice City Cheat Codes: Full List of GTA Vice City Cheats for PC, PlayStation, Xbox, Switch and Mobile
-
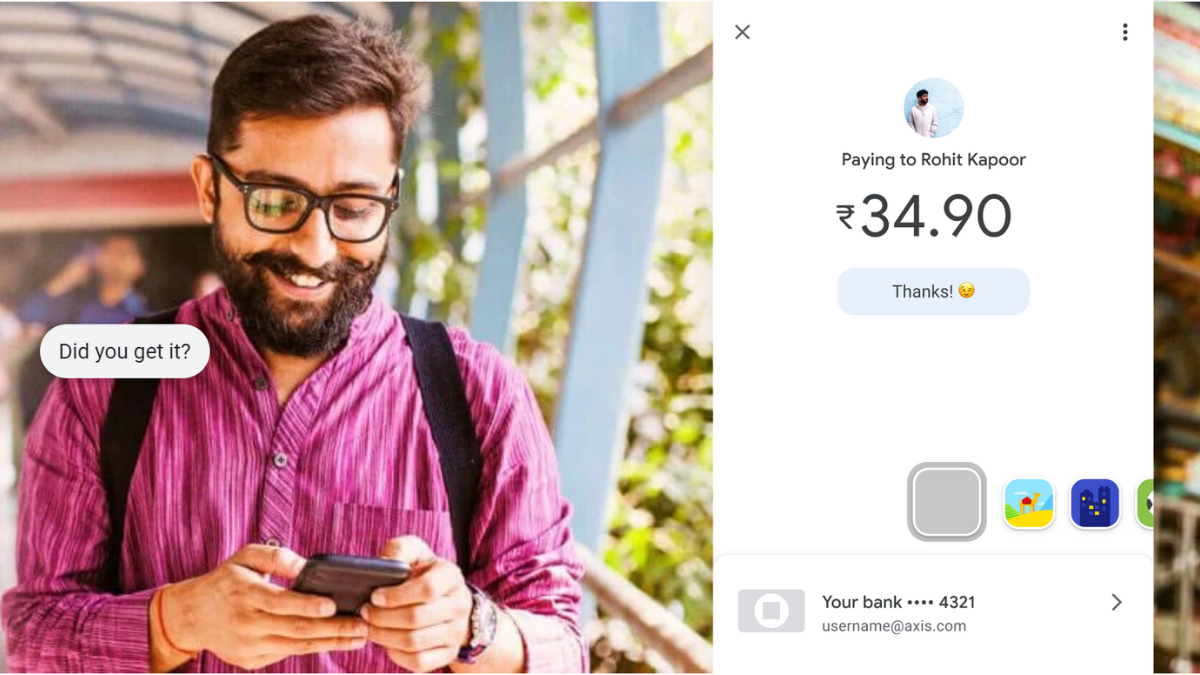
How to Delete Google Pay Transaction History: A Step-by-Step Guide
Google Pay is a popular payment solution in India that caters to millions of people. The UPI-based payment system provides contactless payments effortlessly. However, it also comes with a cost of privacy. Google Pay stores your transaction history. That said, the company also gives you an option to delete your Google Pay transactions history without much hassle. This guide lists different methods to easily delete your Google Pay transaction history using the Google Pay application or your laptop. So, without further ado, let’s get started.
How to Delete Google Pay Transaction History
Google allows you to delete any transaction history on its Google Pay application. Check out these two different methods:
Delete Google Pay Transaction History via Mobile App
One can easily delete Google Pay transaction history from the mobile application. Here’s how:L
Step 1: Open the Google Pay application on your smartphone and tap on the Profile section.
Step 2: Scroll down, tap Settings, and then go to the Privacy & Security option.
Step 3: Tap on the Data & Personalization option and click the Google Account link that will take you to the Google Accounts page.
Step 4: Now, go to Payments & Subscriptions > Payment Info and tap on Manage Experience.
Step 5: Under Payments Transactions & Activity, you will find the list of Google Pay transactions.
Step 6: You can delete individual Google Pay transaction history by tapping the cross button next to the transaction.
Step 7: One can also delete the transaction history in bulk. Just above the transaction, you will find the Delete option.
Step 8: Select the desired time frame, and the data will be deleted from your Google Pay application.
Delete Google Pay Transaction History via Desktop
Google also gives you an option to delete your Google Pay transaction history from your desktop. Here’s how you can do it:
Step 1: Go to https://myaccount.google.com/ and click the Payments & Subscriptions option.
Step 2: Scroll down to find Payment Info and click the Payments Transactions & Activity option.
Step 3: You will find a list of Google Pay transactions. You either individually delete each transaction.
Step 4: One can also delete the transaction history in bulk by clicking the Delete option and selecting the time frame.
How to Export Your Google Pay Account Data?
Google also provides an option to easily export your Google Pay account data for your future use. This option is also viable for those who want to keep a backup before deleting the Google Pay transaction history. Here’s how you can do it:
Step 1: Go to your mobile or desktop browser and visit https://myaccount.google.com/.
Step 2: Under the Data & Privacy section, click ‘Download Your Data’.
Step 3: Now, select Google Pay from the list and tap on Next Step.
Step 4: Select the Transfer to option, Export Frequency, file type, and file size according to your preference and tap on Create Export.
Step 5: You can export all your Google Pay data from your account.
How to Permanently Delete a Google Pay Account?
You can permanently delete a Google Pay account if it is no longer required. Just follow these simple steps to do so.
Step 1: Go to https://myaccount.google.com/ from your mobile or desktop browser.
Step 2: Go to Data & Privacy and then scroll down to Delete a Google Service.
Step 3: You will see a list of services. Search for Google Pay service and click on the dustbin icon right next to it.
Step 4: You will get a warning message. Follow the on-screen instructions, and your Google Pay account will be deleted permanently.
Apple unveiled its first mixed reality headset, the Apple Vision Pro, at its annual developer conference, along with new Mac models and upcoming software updates. We discuss all the most important announcements made by the company at WWDC 2023 on Orbital, the Gadgets 360 podcast. Orbital is available on Spotify, Gaana, JioSaavn, Google Podcasts, Apple Podcasts, Amazon Music and wherever you get your podcasts.Affiliate links may be automatically generated – see our ethics statement for details. -

SBI Balance Check Number: How to Check SBI Balance Online Using Different Methods
State Bank of India (SBI) offers many online services that allow its customers to get all the information swiftly. Gone are the days when you had to wait in a long queue to find the balance of your SBI account. The SBI balance check feature lets you know your account balance with a few clicks.
However, if you are wondering how to check your SBI balance online, you have come to the right place. In this article, we will shed some light on different methods through which you can inquire about your SBI balance. So, without further ado, let’s get started.
SBI Balance Check via Missed Call Banking
SBI allows you to check your account balance using the missed calling banking service. However, you need to first enrol in this service. Here’s how you can enrol for the SBI Missed Call Banking service:
-
Open your Message application on your Android or iOS mobile.
-
Now, send it to 09223488888 from your registered mobile number.
With this, you will be able to register for the SBI Missed Call Banking service. Now, the bank gives you two options: toll-free numbers to check for SBI balance and mini statement.
- 9223766666: You can use this number to get the SBI Balance.
- 9223866666: This number helps you get the last five transaction details of your SBI account.
SBI Balance Check via WhatsApp
SBI customers can also check their SBI balance using WhatsApp. The bank allows you to access different services via its SBI WhatsApp banking services. Here’s how you can use it:
- Save the +919022690226 number on your smartphone.
- Open WhatsApp on your mobile device and search for this number.
- Start a new chat by typing Hi in the chat box.
- Now, click on Get Balance from the prompt.
- With this, you will get the information about your SBI balance with ease.
You can also use WhatsApp Banking service to get mini statements, account statements, other statement services, pension slips, information on loan products, NRI services, pre-approved loan queries, grievance redressal helplines, and more.
SBI Balance Check via SMS
You can also check your SBI Balance by using the SMS service. However, you need to follow the same steps as mentioned in the missed call banking service to register for the service first. Once you are through with the registration process, follow these steps:
- Open your Message application on your Android or iOS mobile.
- Type BAL.
- Now, send it to +919223766666 from your registered mobile number.
With this, you will get the details of your SBI account balance. Moreover, you can send MSTMT to check the mini statement and MODBAL to check your MOD balance.
SBI Balance Check via Yono App
Yono is one of the best options through which you can check your SBI balance with ease. The application is available on Android and iOS platforms, making it easier to get all the banking services under one roof. Here’s how you can check your balance using the Yono application.
- Download and install the Yono application on your mobile.
- Open the application and log in to your account using your username and password.
- Follow the instructions to set up your PIN or biometrics for the app for the first time.
- Once done, on the home screen, you will see the option of View Balance.
- Tap on it, and you will see your SBI account balance.
SBI Balance Check via Net Banking
SBI also gives you the option to check your balance using the Internet banking service. Here’s how you can do it:
- Login to https://www.onlinesbi.sbi/ website on your mobile or desktop browser.
- Click on Login under Personal Banking. If you have a Corporate account, you can select Login under Corporate Banking.
- Click on Continue to Login and enter your username and password alongside the image captcha code.
- Once done, you will receive an OTP on your registered mobile number. Please enter it in the desired field.
- You will be greeted at the homepage of SBI Internet banking.
- Now, go to the Account Summary tab and under Transactions Accounts, click on Click here for balance option.
- With this, you will be able to see your SBI account balance.
-
-

Apple Music Playlists Can Now Be Transferred to YouTube Music: See Transfer Process, Supported Playlists
Apple Music is getting a new cross-platform feature which will allow users to transfer their playlists to YouTube Music. Although the Cupertino-based tech giant highlights that playlists can be transferred to “another service”, only YouTube Music is currently supported. However, users will only be able to transfer the playlists which are self-created or created collaboratively. Music files or the folders in which playlists are organised cannot be transferred through this process.
Apple Music Playlists Can Be Transferred to YouTube Music
The details of Apple’s new playlist transfer functionality have been revealed in a recently published support page. The iPhone maker says that users can request to transfer their Apple Music playlists to YouTube Music from the Data and Privacy page.
In order to transfer playlists, users will require an active Apple Music or iTunes Match subscription as well as an active YouTube Music account. While transferring a playlist will typically take a few minutes, Apple’s support document explains that it can also take up to several hours depending on the number of playlists and their size.
Currently, Apple will let users transfer only those playlists that have been created by them. This also includes the collaborative playlists a user owns. However, non-collaborative shared playlists, curated playlists, or the music files themselves are not transferable. Additionally, the folders where the Apple Music playlists are organised cannot be transferred.
Further, the playlists to be transferred can only include songs that are available on YouTube Music. Any exclusive songs, podcasts, or audiobooks will not be transferred. Notably, the playlist is not deleted from Apple Music after being transferred.
How to Transfer Apple Music Playlists to YouTube Music
- Go to Apple’s Data and Privacy page.
- Sign in to your Apple ID account.
- Select Transfer a copy of your data.
- Follow the onscreen instructions.
- Sign in to your YouTube Music account to start transferring the playlists.
- Apple will send an email notification when the transfer begins.
- You can check the status of the transfer or cancel the transfer on the Data and Privacy page.
- You will receive a confirmation email once the transfer is complete.
For the latest tech news and reviews, follow Gadgets 360 on X, Facebook, WhatsApp, Threads and Google News. For the latest videos on gadgets and tech, subscribe to our YouTube channel. If you want to know everything about top influencers, follow our in-house Who’sThat360 on Instagram and YouTube.
-

How to Unlock PUK Code of Your Airtel SIM Using Different Methods?
Airtel, along with other telecom operators, has a special measure in place to help prevent the misuse of their customers’ SIM cards. One needs to enter a PIN code before accessing the SIM card. If someone enters the wrong PIN, then the SIM card is blocked automatically. This is where the PUK code comes into action. The PUK Codes are unique codes that will unlock your Airtel SIM card. However, there are times when you don’t find them. In this article, we are going to tell you different ways you can get the PUK code for your Airtel SIM. So, without further ado, let’s get started.
What is the Airtel PUK Code?
PUK stands for Personal Unblocking Number, and it is a security feature provided by the operator to restrict other users’ access to SIM cards. The PUK code is generally used to unlock a SIM card after it has been locked by entering the wrong PIN more than three times.
How to Unlock Airtel PUK Code Via SMS?
Airtel customers can unlock the PUK code by sending a message from another Airtel number. Here’s how you can do it:
- Get an alternative Airtel number from your friend or family member
- Take out the SIM and find the PUK code printed on the back side of the SIM body
- Enter the locked phone number and send it to 785
- Once done, Type the PUK 15-digit SIM number and send it to 121
- Airtel will then send you the 8-digit PUK code
- Now, enter the code into your locked Airtel number, and it will be unlocked easily.
How to Unlock Airtel PUK Code Via USSD Code
Here’s how you can unlock Airtel PUK code using the USSD service from Airtel:
- From another Airtel number, simply dial 12151#
- Click on Ok when the pop-up appears
- There will be another pop-up within a few seconds
- From the menu, select the PUK option
- Now, enter your date of birth to verify your identity
- Once done, the PUK code will be shown on your screen
Now, simply enter the PUK code on your locked Airtel number to unlock it.
How to Unlock Airtel PUK Code Via Customer Care
One can also get the PUK code of the locked Airtel number by simply calling customer care. Here’s what you need to know:
- From another Airtel number, dial 121.
- Talk to the customer care representative and tell them the issue with the PUK code
- Verify the necessary details asked by the executive, along with the 15-digit SIM number that is printed on the back of the SIM
- Once done, the customer care executive will provide the PUK code.
How to Unlock Airtel PUK Code By Visiting Airtel Store
If none of the above-mentioned methods works, you can go to your nearest Airtel store with your documents, such as an Aadhaar card and blocked phone number SIM. The team at the store will be able to help you with the problem. You can also request a new Airtel SIM card with a new PUK code.
Frequently Asked Questions (FAQs)
Is there any default Airtel PUK code?
Yes, like other operators, Airtel also has a default PUK code. One can try 0000 or 1234 codes.
Can you unlock your SIM without the PUK code?
No, you cannot unlock your Airtel SIM without a PUK code.
For the latest tech news and reviews, follow Gadgets 360 on X, Facebook, WhatsApp, Threads and Google News. For the latest videos on gadgets and tech, subscribe to our YouTube channel. If you want to know everything about top influencers, follow our in-house Who’sThat360 on Instagram and YouTube.

-
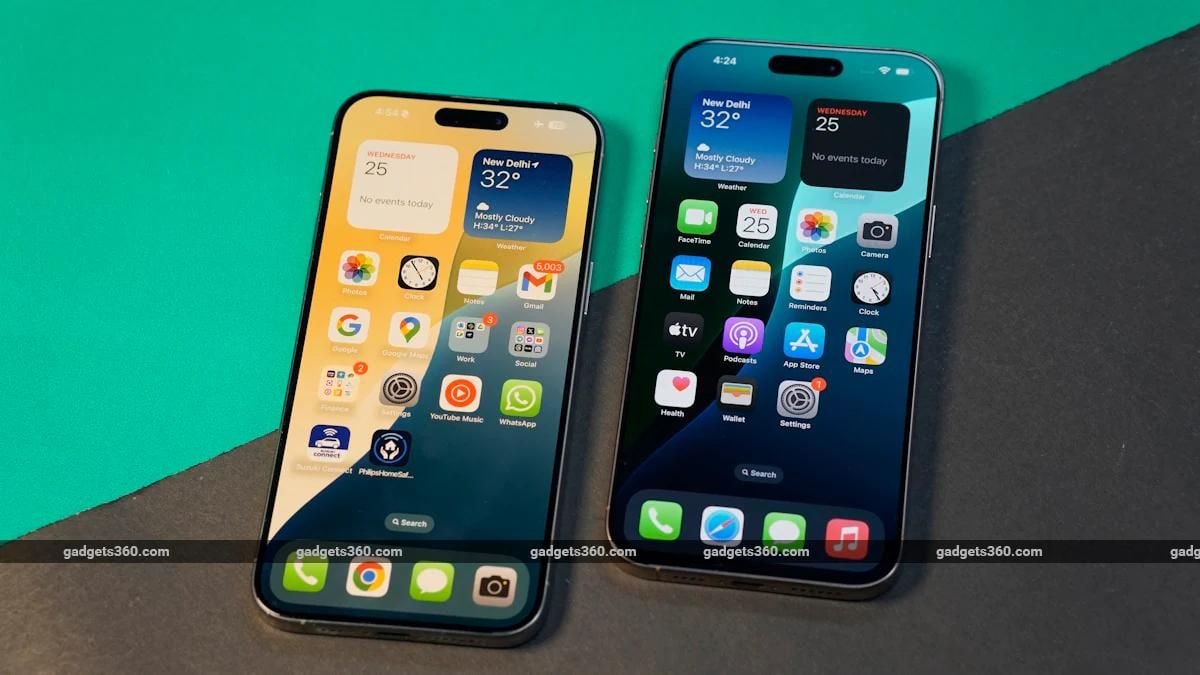
How to Transfer Data From Android to iPhone: A Step-by-Step Guide
Transferring data from your old Android smartphone to a new iPhone can be a challenge for many. There are times when you feel anxious about what will happen to the data on your Android device when you switch to an iPhone. However, it is relatively easy. Apple has made it easy for customers to switch from Android to iPhone. So, if you have recently bought your first iPhone and want to transfer the data from your old Android device, then this guide is meant for you. In this article, we will talk about a step-by-step guide on how you can transfer data from Android to iPhone. So, without further ado, let’s get started.
Things to Remember Before Transferring Data from Android to iPhone
However, before we begin with the transfer process, there are a few things that you need to know. There are some good practices that you should follow before transferring the data:
Battery Percentage: Make sure that both your Android and new iPhone are charged to at least 75 percent of their battery. If possible, keep both devices plugged into a power source throughout the process.
Stable Wi-Fi Connection: As the whole transfer process is done wirelessly, make sure that you are connected to a stable Wi-Fi connection.
Cross-check the data you need to transfer: Your iPhone may not have enough storage capacity to receive every file from your older Android device. This is why it is important to first organize and figure out which data you want to transfer to your new iPhone.
How to Transfer Data from Android to iPhone
The best way to transfer the data from Android to iOS device is by using the Move to iOS app from Apple. The app is available to download on Google Play Store. Here’s how you can transfer the data from Android to iOS using the Move to iOS app.
- Download and install the Move to iOS app on your Android smartphone.
- Now, initiate the setup of your new iPhone and then click on the Apps & Data section.
- Now tap on Move Data from Android.
- On your Android device, open the Move to iOS app and tap on Continue after agreeing to Privacy policies and granting access to your files and location.
- Your iPhone screen will show a one-time code. Enter the code on your Android device to enable the pairing process.
- Once done, select the data you want to transfer to your new iPhone, such as apps, photos, videos, and more.
- Now, leave both devices alone until the loading bar on your IOS device is finished.
- Once the loading bar is finished, tap Done on your Android device, tap Continue on your iPhone, and follow the on-screen instructions to finish setting up your new iPhone.
With this, you will be able to effortlessly transfer data from your Android smartphone to your new iPhone. However, it is important to note a few things. First, one can only transfer apps that are available on both the Google Play Store and the Apple App Store. Moreover, one cannot transfer music, books, and PDFs through the Move to iOS application. One needs to manually transfer these files using iTunes or other methods.
Frequently Asked Questions (FAQs)
What data can I transfer from Android to iPhone using the Move to iOS app?
With the Move to iOS application, you can transfer almost all the data from your Android to your iPhone. The app allows you to transfer files like contacts, messages, photos and videos, bookmarks, email accounts, calendars, Chrome extensions, and more. However, you cannot transfer music, books, and PDFs using the app.
Is transferring data from Android to iPhone easy?
Yes, transferring data from your Android to your iPhone is quite easy. All you need to do is download the Move to iOS application on your Android device and then follow the above-mentioned steps.
Can I use the “Move to iOS” app even if I already set up my iPhone?
No, you cannot use the ‘Move to iOS’ application if you have already set up your iPhone. The app only works while you are setting up your new iPhone.
-

How to Turn On or Off Instagram’s Quiet Mode on Android and iPhone?
Have you ever found yourself caught up in social media notifications, making it harder to focus on other important tasks? Instagram’s Quiet Mode is a lifesaver for anyone who needs a break from constant notifications. The feature is designed to let you concentrate, rest or recharge. The feature basically pauses notifications and informs others that you’re temporarily inactive. This makes it a good feature when you want to concentrate on your work, brainstorm some new ideas, study or just want some peace. However, the question here is: How do I use this feature? To answer this, we have compiled a detailed article talking about some features of Instagram Quiet Mode, how to turn it on or off, and schedule it by following some simple steps. Here’s everything you need to know.
What is Quiet Mode on Instagram?
Quiet Mode on Instagram is a feature designed to help users manage their time and reduce distractions. When you enable this mode, all Instagram notifications are paused and your activity status changes to indicate that you’re In Quiet Mode. If someone sends you a direct message, they’ll receive an automatic response informing them that you’re currently unavailable.
Think of it as Instagram’s version of the Do Not Disturb feature on your phone. The best part? You can still browse Instagram and engage with content without worrying about a flood of notifications interrupting you. It’s a small but powerful tool to support mental well-being and productivity.
How to Turn On Quiet Mode on Instagram?
Activating Quiet Mode is easy. Whether you’re on Android or iPhone, follow these steps:
- Open the Instagram app on your Android or iPhone.
- Now, go to Profile section.
- Tap the three horizontal lines in the top-right corner.
- Select Settings and then tap on Notifications.
- Go to the Quiet Mode option and toggle it on.
When you activate Quiet Mode, your notifications will stop instantly and anyone who messages you will see an auto-reply. If you don’t see the option, ensure your Instagram app is updated or check if it’s available in your region.
How to Turn Off Quiet Mode on Instagram?
Disabling Quiet Mode is just as simple as turning it on:
- Head back to your profile and tap the hamburger menu.
- Navigate to Settings > Notifications > Quiet Mode.
- Toggle the switch to turn it off.
Once Quiet Mode is off, you’ll receive a summary of any missed notifications so you can catch up on everything you’ve missed and then the new notifications will start popping up on your phone.
How to Schedule Quiet Mode on Instagram?
One of the most convenient features of Quiet Mode is the ability to schedule it according to your daily routine. This helps you maintain routine and discipline which we often lack due to social media distractions. This ensures that you won’t be distracted during specific hours, like when you’re working, studying or sleeping.
Here’s how to set it up:- Open the Instagram app and go to your profile.
- Tap the hamburger menu, then select Settings > Notifications.
- Choose Quiet Mode and look for the scheduling options labelled From and To.
- Set your desired start and end times for Quiet Mode.
For example, if you don’t want any interruptions from 10 PM to 7 AM, you can schedule it for those hours. Once set, Quiet Mode will automatically activate and deactivate at the specified times.
Frequently Asked Questions (FAQs)
Can I use Instagram’s Quiet Mode on my desktop?
No, Quiet Mode is currently available only on the Instagram mobile app for Android and iPhone. The feature does not extend to desktop or web versions of Instagram.
Is Quiet Mode available on Instagram in India?
Yes, Quiet mode is available in India.
What happens when Quiet Mode ends?
When Quiet Mode ends, Instagram will summarise the notifications you missed during the inactive period. You can view these notifications at your convenience without worrying about missing anything important.
Can other people see when I am on Quiet Mode?
Yes, if your followers decide to message you while you are in quiet mode, they get a notification in your DM window about your quiet mode status and how you won’t get a notification from them.
-
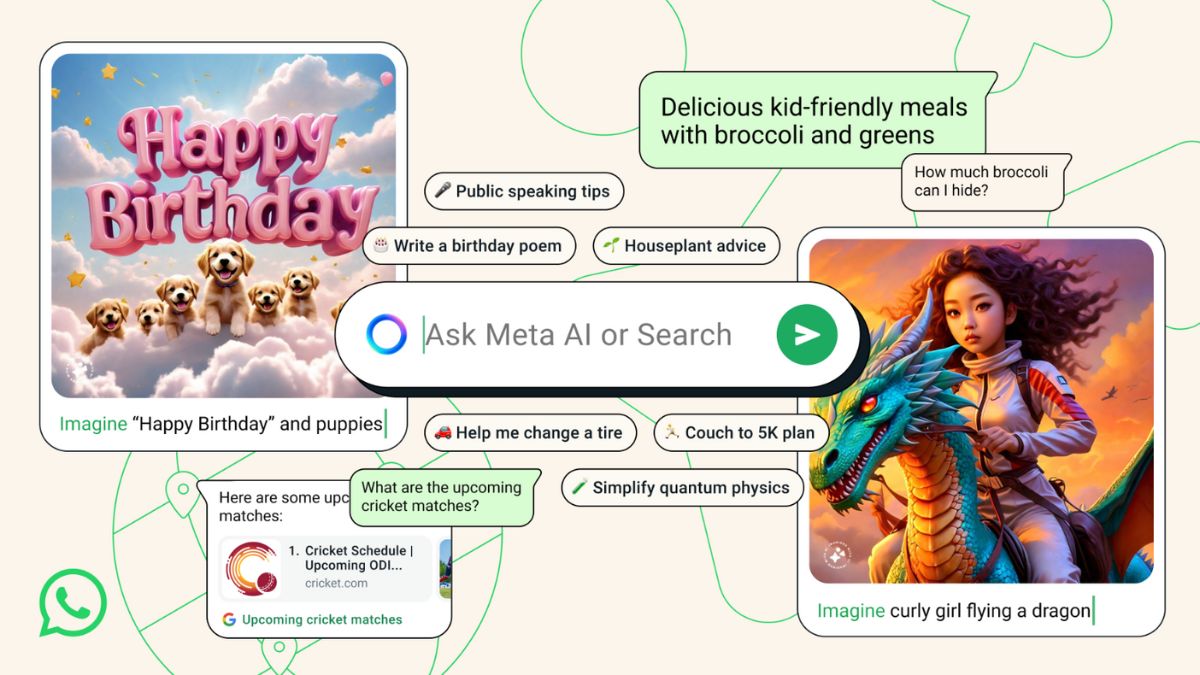
How to Use Meta AI in WhatsApp Individual and Group Chats?
Meta AI brings a plethora of features to its customers. From asking any query to generating images and more, Meta AI is designed to help you out when you need it. And now, the company has finally brought the Meta AI to its most popular application, WhatsApp. Meta AI on WhatsApp brings a multitude of features to the customers, and it is absolutely free. So, if you are wondering how you can use the feature on your Android or iOS device, then you have come to the right place. In this article, we will discuss in detail Meta AI, how you can use it on WhatsApp, what you can do, and more. So, without further ado, let’s get started.
Meta AI is an advanced generative chatbot developed by Meta, the parent company of WhatsApp, Facebook and Instagram. It is powered by the Llama 3 language model. The chatbot is built to assist users in various ways, including providing answers to questions, creating text-based content, generating images and even assisting with tasks like summarising articles or translating text.
Currently, Meta AI supports English and is accessible in several countries, including India, the United States, Australia, the United Kingdom, Canada, Singapore and others. The rollout is being implemented gradually, meaning it may still need to be available to all users across the globe.
Meta AI is integrated seamlessly into WhatsApp, making it accessible for both personal and group interactions. Its capabilities are for increasing productivity and creativity. And it also ensures data privacy by processing only the messages specifically addressed to the bot.
Here’s how you can use Meta AI in individual chats on WhatsApp
- Open WhatsApp on your Android or iOS device.
- Now, simply click on Meta AI icon at the top of the screen.
- This will open a new chat window on WhatsApp.
- Just simply type your questions and Meta AI will respond with relevant information.
Meta AI also includes a unique image-generation feature. To use this, type the word “Imagine” followed by a description of the image you want. For example:
“Imagine a sunset over a snowy mountain.”
“Imagine a futuristic city with flying cars.”Meta AI is equally accessible in WhatsApp group chats, allowing multiple users to benefit from its capabilities simultaneously. This functionality is designed to encourage collaborative problem-solving, creative brainstorming and shared exploration of AI tools.
Select the group chat where you want to use Meta AI. Ensure that the group has enabled Meta AI access.
- In the message field, type the “@” symbol.
- A dropdown menu will appear, listing participants and the Meta AI chatbot.
- Select Meta AI from the list.
- Type your question, request, or command and hit send.
- Meta AI will respond to the group chat, making its reply visible to all participants.
That said, if you want to follow-up on the repsonse, you can easily swipe right on the message with the questions.
Frequently Asked Questions (FAQs)
Q1. How do I enable AI search in WhatsApp?
To use AI search, simply locate the Meta AI icon in your app and start a conversation. In group chats, tag Meta AI using the “@” symbol.
Q2. Is Meta AI in WhatsApp safe?
Yes, Meta AI processes only the messages addressed to it, maintaining user privacy. Unrelated conversations remain inaccessible to the chatbot.
Q3. Can I disable Meta AI on WhatsApp?
Currently, there is no option to disable Meta AI. However, you can choose not to interact with it.
Q4. In which languages is Meta AI available?
Meta AI currently supports English and is being gradually introduced to users worldwide.
-
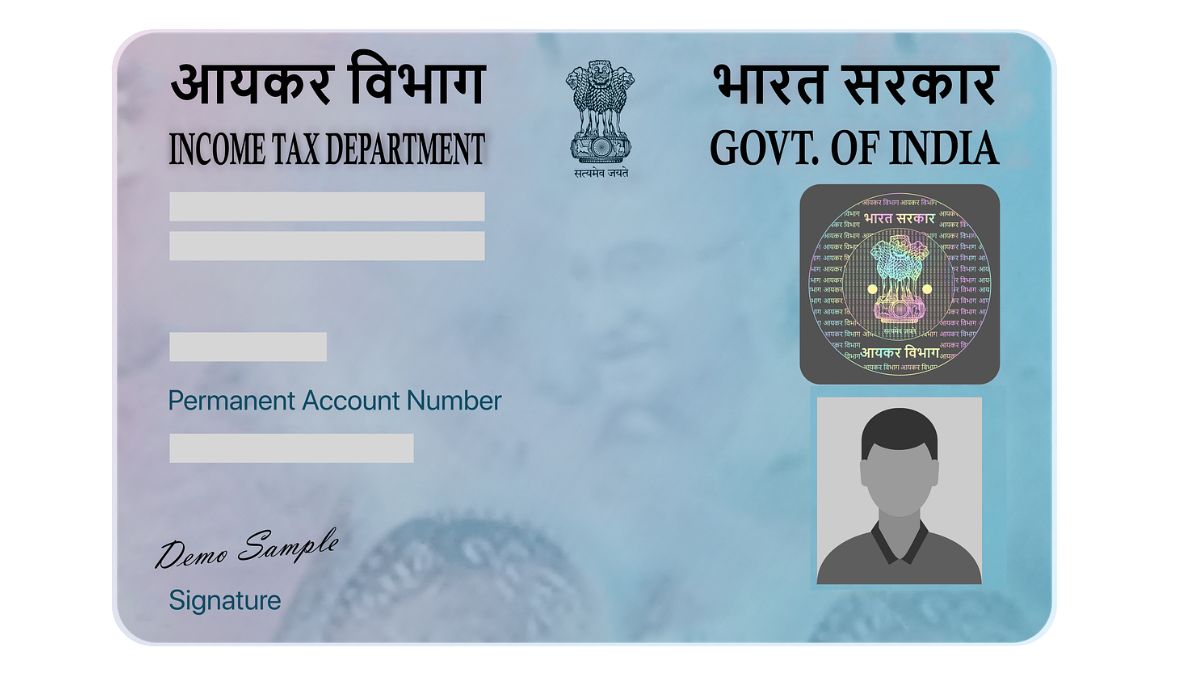
How To Apply For Pan 2.0 with QR Code Online: Check Benefits, Documents Required, and More
India’s Income Tax Department has launched PAN 2.0, an upgraded version of the Permanent Account Number card. The newly introduced system brings enhanced accessibility, ensures secure data storage and streamlines application and verification processes. Interestingly, the new PAN Card now also incorporates a QR code and offers a host of digital functionalities. The card offers e-PANs delivered directly to applicants’ emails at no charge, with additional options for physical PAN cards for a nominal fee. This comprehensive guide covers everything you need to know about PAN 2.0, from the application process to its benefits and eligibility criteria.
What is the PAN 2.0?
PAN 2.0, referred to as the next-generation PAN card, is a technological upgrade to the existing system. It integrates advanced features such as digital application processing, a unique QR code for secure identity verification, and Aadhaar integration for instant authentication.
The PAN 2.0 reduces the dependency on physical paperwork while enhancing data protection. This simplifies compliance for individuals, businesses, and other entities requiring PAN cards for financial or tax-related purposes.
Key highlights include:
- Quick Processing: Applications are processed faster, with instant e-PAN issuance in many cases.
- Digital Accessibility: Updates to personal details can be made online.
- Enhanced Verification: QR codes add an extra layer of security, ensuring authenticity.
How to Apply for PAN 2.0 Online?
Applying for PAN 2.0 has been made seamless, with two primary portals available for users: NSDL and UTIITSL. Here’s a step-by-step guide for each platform.
How to Apply for PAN 2.0 via NSDL?
- Visit the NSDL PAN portal at https://www.onlineservices.nsdl.com.
- Select the option for “Apply for PAN 2.0” or “Request e-PAN.”
- Enter your details, including:
- Name
- Date of birth
- Aadhaar number (for individual applicants)
- Upload scanned copies of the required documents, including your photograph and signature.
- Pay the processing fee using the available digital payment options.
- Verify your application through an OTP sent to your registered mobile number or email.
- Upon successful verification, your e-PAN will be issued within minutes and emailed to your registered address.
How to Apply for PAN 2.0 via UTIITSL?
- Navigate to the UTIITSL PAN services portal.
- Choose the “Apply for New PAN” or “Upgrade to PAN 2.0” option.
- Provide your personal information and Aadhaar details.
- Upload the necessary documents in the prescribed format.
- Complete the payment process through the secure payment gateway.
- Submit your application and note the acknowledgement number for tracking.
- Once verified, your e-PAN will be sent to your email address. Physical cards, if opted for, will be dispatched to your registered address.
Benefits of PAN 2.0
PAN 2.0 is designed to provide a more efficient and secure experience for taxpayers. Below are the key benefits of this next-generation system:
- Instant Application Processing: The online process significantly reduces the time taken to issue PAN cards, with e-PANs often delivered instantly.
- Enhanced Security: QR codes embedded in PAN 2.0 ensure that identity verification is swift and secure, minimising risks of fraud.
- Digital Updates: Users can easily update their PAN card details without visiting physical offices.
- Aadhaar Integration: Instant verification through Aadhaar linkage eliminates the need for additional documentation.
- Environmentally Friendly: The e-PAN format reduces the dependency on physical cards, contributing to sustainability.
- Centralised Services: All PAN-related services, including corrections and updates, are centralised on a unified platform, making it easier for users to manage their information.
Documents Required for PAN 2.0
Applicants must submit the following documents to apply for PAN 2.0:
- Proof of Identity (any one):
- Aadhaar card
- Passport
- Voter ID card
- Driving licence
- Proof of Address (any one):
- Utility bills (electricity, water, gas, etc.)
- Bank account statement or passbook
- Rental agreement
- Proof of Date of Birth (any one):
- Birth certificate
- School leaving certificate
- Passport
Ensure that scanned copies of the documents are legible and meet the required size and format specifications when uploading.
Who is Eligible for PAN 2.0?
The following entities and individuals are eligible for PAN 2.0:
● Indian Citizens: Individuals needing a PAN for financial transactions, tax filing or other compliance purposes.
● Business Entities: Companies, firms and organisations registered under Indian law.
● Foreign Nationals and Entities: Non-residents with business or financial activities in India.
● Minors: PAN can be applied for minors under a parent or guardian’s name.Note that having multiple PAN cards is prohibited. Existing PAN holders can opt for an upgrade to PAN 2.0 to access its advanced features.
Frequently Asked Questions (FAQs)
Can I upgrade my existing PAN to PAN 2.0?
Yes, current PAN cardholders can upgrade to PAN 2.0 through the online portals. The upgraded version retains the same PAN number.
Is there a fee for e-PAN applications?
The e-PAN is free for up to three requests within a 30-day period from issuance. Beyond that, a nominal fee applies.
Are existing PAN cards still valid?
Yes, existing PAN cards remain valid indefinitely. The PAN 2.0 upgrade is optional but recommended for its added benefits.
How secure is the QR code on PAN 2.0?
The QR code is encrypted and accessible only through authorised tools, ensuring high levels of security and preventing misuse.
How long does it take to receive a PAN 2.0 card?
E-PANs are issued almost instantly after a successful application. Physical cards, if opted for, are delivered within 15 working days.
What should I do if my e-PAN is not delivered?
In case of non-delivery, contact the respective service provider’s helpline or customer support for assistance.
For the latest tech news and reviews, follow Gadgets 360 on X, Facebook, WhatsApp, Threads and Google News. For the latest videos on gadgets and tech, subscribe to our YouTube channel. If you want to know everything about top influencers, follow our in-house Who’sThat360 on Instagram and YouTube.
