Blog

  • How to Unlock WhatsApp Chats on Android and iOS: A Step-by-Step Guide

    How to Unlock WhatsApp Chats on Android and iOS: A Step-by-Step Guide


    WhatsApp continues to be a preferred platform for millions worldwide. With its focus on user privacy, WhatsApp offers a range of features to safeguard conversations, one of which is the Chat Lock feature. This tool allows users to secure specific chats with an additional layer of protection, such as a password, fingerprint or Face ID. This guide will walk you through the process of unlocking WhatsApp chats. We’ll also cover how to set up and remove chat locks, as well as explore the benefits of using this feature.

    What is WhatsApp Chat Lock?

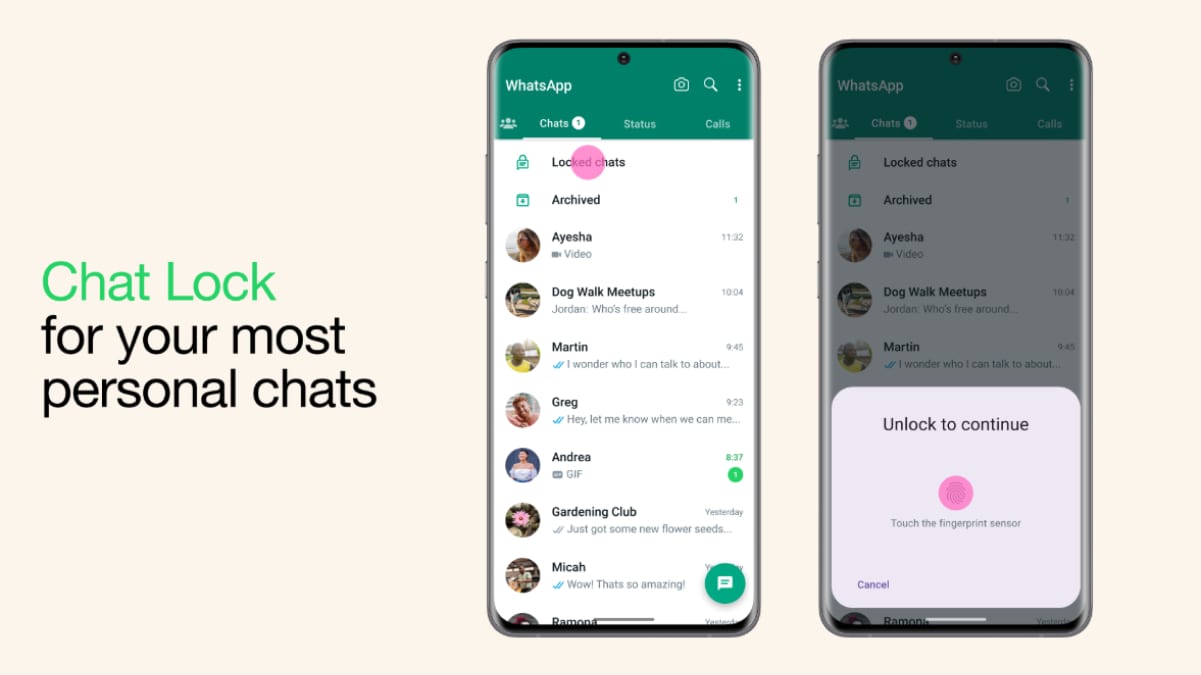
    WhatsApp’s Chat Lock is designed for user privacy by allowing individuals to secure specific chats. Once locked, these chats are moved to a separate “Locked Chats” folder, which can only be accessed with the designated authentication method. This feature is especially useful for keeping sensitive conversations away from prying eyes, particularly on shared or borrowed devices.

    Key Features of Chat Lock:

    1. Selective Locking: Lock only specific chats instead of the entire app.
    2. Hidden Notifications: Notifications from locked chats are concealed, ensuring added privacy.
    3. Multiple Security Methods: Depending on your device, you can use a PIN, password, fingerprint or Face ID to secure chats.

    Now that we understand what Chat Lock is, let’s dive into how to use this feature effectively, starting with locking chats.

    How to Lock Chats on WhatsApp

    Before unlocking chats, it’s important to understand how to lock them. The Chat Lock feature ensures your private conversations are secure and here’s how to enable it:

    On Android

    1. Open WhatsApp and select the chat you wish to lock.
    2. Tap on the contact’s or group’s name at the top of the screen.
    3. Scroll down and choose “Chat Lock.”
    4. Enable the toggle for “Lock this chat with fingerprint or PIN.”
    5. Follow the on-screen instructions to confirm your authentication method.

    On iOS

    1. Launch WhatsApp and open the chat you want to secure.
    2. Tap the contact’s or group’s name at the top.
    3. Select “Chat Lock” from the menu.
    4. Enable Face ID or passcode locking by toggling the option.
    5. Authenticate with your Face ID or passcode to complete the setup.

    Once locked, these chats are moved to a “Locked Chats” folder, hidden from the main chat list. Notifications from these chats are also concealed to enhance privacy.

    How to Unlock Chats on WhatsApp

    When it’s time to access your locked chats, the process is straightforward. Let’s explore how to unlock chats on Android and iOS devices.

    How to Unlock Chats on Android?

    1. Open WhatsApp and scroll to the top of the chat list.
    2. Tap on the “Locked Chats” folder.
    3. Authenticate using your fingerprint, PIN or pattern.
    4. Select the chat you want to view.
    5. While in the locked chat, tap on the contact’s or group’s name.
    6. Navigate to “Chat Lock” and disable the toggle.
    7. The chat will now return to the main chat list without requiring authentication.

    How to Unlock Chats on iOS?

    1. Open WhatsApp and navigate to the “Locked Chats” section.
    2. Authenticate using Face ID, Touch ID or your passcode.
    3. Select the desired chat to access it.
    4. Long-press the contact’s name at the top to open chat settings.
    5. Tap on the Unlock Chat option.
    6. The chat will appear in your main chat list without any lock.

    How to Remove Chat Lock on WhatsApp?

    If you no longer need to keep a chat locked, removing the lock is simple. Follow these steps:

    1. Open WhatsApp and go to the “Locked Chats” folder.
    2. Authenticate to access the list of locked chats.
    3. Select the chat you want to unlock.
    4. Open the chat, tap the contact’s or group’s name and navigate to “Chat Lock.”
    5. Disable the toggle to remove the lock.

    Once removed, the chat will be visible in your main chat list and accessible without any authentication.

    Benefits of Using WhatsApp Chat Lock

    The Chat Lock feature offers multiple advantages that make it a must-use tool for privacy-conscious individuals:

    • Enhanced Privacy: Keep sensitive conversations secure from prying eyes, especially on shared devices.
    • Selective Locking: Lock only specific chats rather than the entire app, offering greater flexibility.
    • Hidden Notifications: Notifications from locked chats are hidden to prevent unauthorised access.
    • Multiple Security Options: Use PIN, password, fingerprint or Face ID to protect your chats, based on your preference and device capabilities.
    • Separate Folder: Locked chats are stored in a dedicated folder, keeping them organised and out of sight.

    Frequently Asked Questions (FAQs)

    Can you lock group chats or muted chats in WhatsApp?

    Yes, WhatsApp allows you to lock individual and group chats, including muted ones. The locking process remains the same for all types of conversations.

    Will the recipient be notified if I lock the chat?

    No, the recipient will not be notified if you lock a chat. The Chat Lock feature is private and does not alert the other participant.

    How do you access locked chats on WhatsApp?

    To access locked chats, go to the “Locked Chats” folder at the top of your chat list. Authenticate using your chosen method such as PIN, fingerprint, Face ID, etc. to view and interact with the chats.


    Source link

  • How to Create Polls in WhatsApp: A Step-by-Step Guide

    How to Create Polls in WhatsApp: A Step-by-Step Guide


    WhatsApp polls offer a convenient way to gather opinions, streamline decision-making and enhance communication within personal and professional settings. With this feature, users can create questions with multiple answer options directly within a chat. The feature has become indispensable for organising events, collecting feedback and conducting quick surveys. Whether you are planning a group activity or gathering input on a pressing issue, WhatsApp polls simplify the process, making it more engaging and interactive for participants. So, if you wondering how you can create WhatsApp polls, then you have come to the right place. In this article, we will talk in detail about WhatsApp polls, how to create them, how to view the polls, and more. So, without further ado, let’s get started.

    What is WhatsApp Poll?

    A WhatsApp poll is a feature that allows users to post a question with several answer choices in a chat or group. Participants can select their preferred option(s) and view results in real time. Users can create polls with up to 12 options and there is flexibility to enable or disable multiple answers.

    How to Create Polls on WhatsApp?

    Creating polls in WhatsApp is quite easy. Here’s how you can create a WhatsApp poll from your Android or iOS device:
    For Android Devices:

    1. Open the chat you want to create a poll in.
    2. Tap the attachment icon (paperclip symbol).
    3. Select “Poll” from the options.
    4. Enter your question under “Question”.
    5. Add up to 12 answer choices under “Options”.
    6. Rearrange the options by holding and sliding them up or down.
    7. Toggle off “Allow Multiple Answers” if only one response is required.
    8. Tap “Send” to post the poll.

    For iOS Devices:

    1. Open the relevant chat.
    2. Tap the “+” icon near the message box.
    3. Choose “Poll”.
    4. Input your questions and options.
    5. Adjust the order by dragging them as needed.
    6. Toggle off multiple answers if only a single response is needed.
    7. Press “Send” to share the poll.

    How to Respond to Polls on WhatsApp?

    Voting in WhatsApp polls is simple, easy and doesn’t take much of your time unless you are a bit indecisive. Here’s how:

    1. Open the chat containing the poll.
    2. Tap on your selected option(s).
    3. To change your vote, tap a different option. Or if you want to cancel the vote, then double tap on the same option.
    4. Votes are recorded instantly and results are updated in real-time.

    How to View Polls on WhatsApp?

    Here’s how you can check the progress and results of a poll:

    1. Open WhatsApp on your Android or iOS device.
    2. Open the chat with the poll.
    3. Locate the poll and tap “View Votes”.
    4. You can see the results along with details of individual responses.

    How to Delete Polls on WhatsApp?

    Polls can be deleted easily by following these steps:

    1. Open the chat with the poll to be removed.
    2. Tap the down arrow in the top-right corner of the poll.
    3. Select the “Delete” option.
    4. Choose between “Delete for Everyone” or “Delete for Me”.

    With this, your WhatsApp poll will be deleted instantly.

    How to Create Channel Polls on WhatsApp?

    WhatsApp has also given an option to create polls in Channels. Here’s how you can do it:

    1. Navigate to your WhatsApp channel.
    2. Tap the “Create Poll” button.
    3. Input the question and answer options.
    4. Publish the poll to your channel for followers to participate.

    How to View Channel Polls on WhatsApp?

    Channel poll results can be monitored through these steps:

    1. Open your WhatsApp channel.
    2. Tap on the poll in question.
    3. Access the results and analyse audience responses.

    Frequently Asked Questions (FAQs)

    What is the use of WhatsApp polls?

    WhatsApp polls are used to gather opinions, make decisions and collect feedback efficiently. They are widely employed in both personal and professional contexts. From deciding on holiday destinations with friends to gathering feedback on workplace initiatives, the applications are endless.

    Who can see WhatsApp poll results?

    Poll results are visible to all participants in the chat, group or channel where the poll was created.

    What is the limit of the WhatsApp poll?

    Each poll can include up to 12 options, with each option capped at 100 character### s.

    Do WhatsApp polls expire?

    Polls do not have a predefined expiration, but the creator can delete them anytime.

    Can a WhatsApp poll be edited?

    Once a poll is posted, it cannot be edited. One needs to create a new poll with changes.

    Are WhatsApp polls anonymous?

    No, WhatsApp polls are not anonymous. Participants’ names and choices are visible to all members of the chat or group.


    Source link

  • How to Enable or Disable Live Voicemail Feature on iPhone

    How to Enable or Disable Live Voicemail Feature on iPhone


    Apple introduced the Live voicemail feature on iPhones in India with the latest iOS 18 update. The feature serves as an answering system for missed calls, allowing callers to leave messages. This functionality includes both traditional voicemail and Live Voicemail, which transcribes messages in real-time. Users can listen to recordings or view transcriptions within the Phone app. The feature supports efficient communication and ensures users never miss important updates, even when they cannot answer calls. Here is a step-by-step guide on how to disable the feature if you do not wish to use it and how to enable it if you haven’t already!

    How Does Voicemail Feature Work on iPhone?

    The voicemail system records the caller’s message after a preset duration when calls remain unanswered. Recent iOS updates have introduced the Live Voicemail feature in major regions. This allows real-time transcription of voicemails, enabling users to screen and prioritise calls even before they pick up.

    Callers who encounter voicemail are presented with two primary scenarios. They either hear a default system greeting or a customised one recorded by the user. These settings enhance communication for professionals and personal users alike.

    Key functionalities include:

    • Recording messages when the phone is unanswered or unreachable.
    • Real-time transcription via Live Voicemail.
    • Saving voicemails for future reference.
    • The ability to customise greetings for a personalised touch.

    How to Enable Voicemail Feature on iPhone

    Live Voicemail is automatically enabled in iPhones running iOS 17 and above. If it is not active, follow these steps:

    1. Open the Phone app on your iPhone.
    2. Tap on the Voicemail tab in the bottom-right corner.
    3. Select Set Up Now to begin the setup process.
    4. Create a password for your voicemail.
    5. Choose between the default greeting or a custom one. To record a custom greeting, follow the prompts.
    6. Save your settings to activate voicemail.

    Tip: It’s advisable to test the voicemail feature by calling your own number to ensure the greeting is functioning and as per your expectations. You can always make changes to your custom greeting.

    How to Disable Voicemail Feature on iPhone

    For users who prefer not to use voicemail, disabling the feature may be necessary. Note that voicemail settings are often dependent on the carrier. Here’s how to proceed:

    The feature also includes the ability to listen to messages while they are being recorded and save transcriptions for future reference. Customised greetings can be set to personalise the caller’s experience. It is a valuable tool for professionals and individuals seeking efficient communication management.

    For users who wish to disable Live Voicemail:

    1. Open ‘Settings’ and navigate to ‘Phone.’
    2. Locate the ‘Live Voicemail’ option.
    3. Toggle the feature off to deactivate it.

    Alternative Method:

    Some carriers allow users to disable voicemail through dialled codes. Contact customer service or visit the carrier’s website to find specific instructions. For Visual Voicemail as well, you can contact your mobile carrier to assist with disabling the service as it is carrier-dependent.

    Live Voicemail Features

    The Live Voicemail feature, introduced with iOS 17, is a significant upgrade in voicemail technology. It offers real-time transcription, helping users manage calls effectively. Below are some of its notable features:

    • Real-Time Transcription: As callers leave messages, the system transcribes their words into text. This transcription appears on the iPhone screen, allowing users to gauge the importance of the message instantly.
    • Call Screening: Live Voicemail lets users decide whether to answer a call while a voicemail is being recorded. This can be particularly useful for screening unknown numbers.
    • Spam Detection: Calls flagged as spam by the carrier are automatically declined and not recorded as voicemails. This saves time and keeps unnecessary messages from cluttering the inbox.
    • Custom Greetings: Users can personalise greetings for a more professional or friendly touch. This ensures callers feel acknowledged.

    Frequently Asked Questions (FAQs)

    What is the use of voicemail on iPhone?

    Voicemail allows users to receive and retrieve voice messages when they cannot answer calls. This ensures no important communication is missed.

    How do I add a custom voicemail?

    You can record a custom voicemail greeting via the Phone app by selecting Voicemail > Set Up Now > Custom Greeting. Follow prompts to create a personalised message.

    Is iPhone voicemail free?

    Voicemail services are typically included in carrier plans, but some networks may charge for voicemail access or retrieval. It’s advisable to confirm details with your service provider.

    Do voicemails delete on iPhone?

    Voicemails can be deleted manually or may be removed automatically after a specific period, depending on carrier settings. It’s recommended to save important messages externally.


    Source link

  • How to Share Sticker Packs on WhatsApp for iOS and Android

    How to Share Sticker Packs on WhatsApp for iOS and Android


    WhatsApp recently rolled out a feature that makes it much easier to share sticker packs with other users on the messaging platform. The new WhatsApp sticker sharing feature is available on iOS and Android, allowing users to send an entire sticker pack at a time, in the form of a link. Recipients can tap on the sticker pack link to download and install it on their handset. The feature currently works with sticker packs that can be browsed inside WhatsApp.

    How to Share Sticker Packs on WhatsApp

    If you’re running a recent version of WhatsApp for iOS or WhatsApp for Android, you should be able to share sticker packs with your contacts by following the steps outlined below. If the option to share a sticker pack isn’t available on your smartphone, you might have to wait until the feature is enabled on your account.

    1. Open WhatsApp and select the chat where you want to share the sticker pack.

    2. On the message composer bar, tap on the Sticker button, which is aligned to the left side on Android and to the right side on iOS.

    3. Tap on the stickers tab and scroll down, past your recent and favourite stickers.

    4. Once you reach the sticker pack you want to share, tap on the three-dot menu on the right side of the sticker pack name.

    5. Send the link to the sticker pack using the green-coloured Send button.

    Sharing sticker packs on WhatsApp (tap to expand)


    How to Download and Install Shared Sticker Packs on WhatsApp

    If you have received a sticker pack from another user on WhatsApp, you can quickly install it on your handset. You’ll need to be running a recent version of WhatsApp, so make sure you check the App Store or the Play Store for updates.

    1. Open the WhatsApp chat that contains a link to the sticker pack.
    2. Tap View sticker pack.
    3. Scrolling through the sticker pack and verify that you want to install it.
    4. Tap Add to my stickers.

    For the latest tech news and reviews, follow Gadgets 360 on X, Facebook, WhatsApp, Threads and Google News. For the latest videos on gadgets and tech, subscribe to our YouTube channel. If you want to know everything about top influencers, follow our in-house Who’sThat360 on Instagram and YouTube.


    Realme Narzo 80 Ultra India Launch Timeline, Storage Configuration Leaked Ahead of Debut


    Webb Telescope Confirms Planet-Forming Disks Last Longer in Early Universe


    Source link

  • How to Change Address in Aadhaar Card Online for Free?

    How to Change Address in Aadhaar Card Online for Free?


    The Aadhaar card, a 12-digit unique identification number issued by the Unique Identification Authority of India (UIDAI), is an important document for accessing a wide range of government services and benefits. Recently, UIDAI extended the deadline for free Aadhaar updates to June 14, 2025, allowing citizens the time to update their Aadhaar card as soon as possible. Keeping Aadhaar information up-to-date is vital to avoid discrepancies and ensure seamless access to services. For instance, if you’ve moved to a new address, updating this information on your Aadhaar card is essential. Here’s a step-by-step guide to updating your Aadhaar address, including the process, required documents, and key details.

    How to Change Address in Aadhaar Card for Free Online?

    Follow these steps to complete the address change online:

    1. Go to the Self-Service Update Portal (https://ssup.uidai.gov.in/ssup/) from your mobile or desktop browser.
    2. Enter your Aadhaar number and authenticate your login using the OTP sent to your registered mobile number.
    3. Click on “Update Address in Aadhaar.”
    4. your updated address accurately in every field.
    5. Scan and upload a valid document that verifies your new address. Accepted documents include a passport, bank statement, voter ID, or utility bill.
    6. Double-check the details before submitting your request.
    7. Once submitted, you will receive a Service Request Number (SRN) for tracking purposes.

    How to Change Aadhaar Card Address Offline?

    For those who prefer an in-person approach or do not have access to online facilities, the address can be updated offline at an Aadhaar Seva Kendra or Aadhaar Enrolment Centre.

    1. Find the nearest enrolment centre through the UIDAI website.
    2. Obtain and complete the Aadhaar Update Form at the centre.
    3. Provide a valid Proof of Address (PoA) document.
    4. Authenticate your identity with biometric verification.
    5. A nominal fee of Rs. 50 is charged for updates made offline.
    6. After submission, collect the acknowledgement slip containing your Update Request Number (URN) to track the status of your update.

    Documents Required for Aadhaar Card Address Change

    UIDAI accepts a wide range of documents as Proof of Address (PoA). Ensure you carry original documents when visiting an enrolment centre or upload clear, scanned copies online.

    • Passport
    • Bank Statement or Passbook
    • Voter ID Card
    • Driving Licence
    • Utility Bills (Electricity, Water, Telephone)
    • Property Tax Receipt
    • Ration Card
    • Pensioner Card

    Make sure the document you submit reflects the current address accurately.

    How to Check Aadhaar Card Address Update Status?

    Once you have submitted your address change request, you can track its status online using the Service Request Number (SRN) or Update Request Number (URN) provided during submission.

    1. Visit the UIDAI Update Status Portal.7285254
    2. Enter your Aadhaar number and SRN/URN.
    3. Complete OTP-based authentication.
    4. The current status of your request will be displayed.

    Statuses could include:

    • Pending Verification: Your request is under process.
    •  Rejected: UIDAI may reject requests if documents are invalid or incorrect.
    • Completed: The update has been successfully processed.

    How To Download the Aadhaar Card After Address Change?

    Once your address update is approved, you can download the updated Aadhaar card in a few simple steps:

    1. Visit the UIDAI e-Aadhaar Portal and head to the Download Aadhaar page.
    2. Enter your Aadhaar number, VID, or Enrolment ID.
    3. Enter the OTP sent to your registered mobile number for verification.
    4. The updated Aadhaar card will be available as a PDF file.
    5. Use the password (first four letters of your name in capital letters and year of birth) to open it.

    Frequently Asked Questions (FAQs)

    How many times can Aadhaar address be updated online?

    UIDAI allows residents to update their Aadhaar address multiple times, but only when justified by valid reasons such as relocation. Each update must include a valid Proof of Address (PoA) document.

    How much time does it take to change the Aadhaar card address?

    The update process typically takes up to 30 days. However, certain cases may require more time, depending on document verification and system workload.

    Can we update the Aadhaar address online without proof?

    No, updating your Aadhaar address online requires a valid Proof of Address (PoA) document. Alternatively, a Head of Family (HoF) can authorise the update using their Aadhaar details.

    How much does it cost to change the Aadhaar address?

    Online address updates are currently free until June 14, 2025. Offline updates at Aadhaar Seva Kendras cost Rs. 50 per request.


    Source link

  • How to Find CIF Number in SBI Using Net Banking, YONO App, and More Online

    How to Find CIF Number in SBI Using Net Banking, YONO App, and More Online


    The SBI CIF number, or Customer Information File number, is a unique identifier assigned to each account holder by the State Bank of India (SBI). This number serves as a comprehensive repository of essential customer data, including account details, transaction histories, loans and Know Your Customer (KYC) information. By consolidating all relevant information under a single CIF number, SBI enhances its ability to manage customer interactions and maintain security. Each customer is assigned only one CIF number, regardless of how many accounts they hold with the bank, ensuring streamlined access to their banking information.

    The significance of the SBI CIF number extends beyond identification; it plays a crucial role in safeguarding customer privacy and preventing fraud. This unique identifier allows SBI to monitor transactions effectively and verify customer identities during various banking activities. In this guide we will further talk about what is A CIF number and how to find yours thought different modes!

    What is CIF Number in SBI?

    The Customer Identification File (CIF) number is an 11-digit unique identifier assigned to every customer by banks, including the State Bank of India (SBI). It serves as a comprehensive database containing critical details such as KYC information, account summaries, loan details, transaction history, and personal information. SBI customers can easily access their CIF number through various methods, including net banking, the YONO app, SMS, or by visiting a branch.

    How to Find CIF Number in SBI Using Net Banking

    There are many ways to find your CIF number. Here is how you can get it via Net Banking

    1. Log in to SBI Net1. Visit the SBI Net Banking portal and log in using your credentials. https://retail.onlinesbi.com
    2. Once logged in, go to the ‘Account Summary’ section available on the dashboard.
    3. Click on the specific account whose CIF number you wish to locate.
    4. The CIF number will be displayed alongside other account details such as branch code and IFSC.
    5. Ensure you have your net banking login credentials ready to access this feature.

    How to Find CIF Number in SBI Using YONO App

    If you use the SBI YONO app, here is how you can find your CIF number:

    1. Download the YONO SBI app if you haven’t already and log in using your MPIN or credentials.
    2. Tap on the ‘Services’ or ‘My Profile’ section in the app.
    3. Your CIF number will appear under the profile or account information section.

    The YONO app provides a user-friendly way to access your CIF number along with other account details.

    How to Find CIF Number in SBI Using SMS

    Currently, SBI does not allow customers to retrieve their CIF number directly through SMS. However, you can utilize SMS services to check your account balance or request account statements, which may include the CIF number. To explore this option, ensure your mobile number is registered with the bank.

    To check your account balance via SMS, send “BAL” to 09223766666. For a mini statement, you can send “MSTMT” to 09223866666. These services provide a convenient way to access essential banking information without needing to log in to online banking or visit a branch.

    Frequently Asked Questions (FAQs)

    Are the CIF number and account number the same?

    No, the CIF number and account number are distinct. The CIF number represents the customer, while the account number is specific to each bank account under a customer’s profile.

    What is the use of CIF number in SBI?

    The CIF number is used to store and manage customer data efficiently. It links all your accounts and enables streamlined banking services like account updates, fund transfers, and loan applications.

    Can two accounts have the same CIF number?

    Yes, all accounts belonging to the same customer are associated with a single CIF number. This ensures seamless management of multiple accounts.

    Can we share CIF number with others?

    It’s advisable to keep your CIF number confidential. Sharing it with unauthorized individuals could lead to potential misuse of your banking information.

    What is the full form of CIF in bank?

    CIF stands for Customer Information File. It is a unique number used by banks to manage and consolidate customer data.


    Source link

  • How to Check SBI Mini Statement Using Missed Call Service, Net Banking, YONO App, and More

    How to Check SBI Mini Statement Using Missed Call Service, Net Banking, YONO App, and More


    The State Bank of India (SBI) offers multiple convenient ways to access your mini statement, providing a quick summary of recent transactions in your account. Whether you prefer using the missed call service, net banking, the YONO app, SMS, or even WhatsApp, SBI ensures you can stay updated on your account activity effortlessly. This guide outlines the step-by-step process for each method to help you manage your finances with ease and get access to information regarding your bank account anytime and anywhere.

    What is SBI Mini Statement?

    A mini statement from the State Bank of India (SBI) is a convenient summary of recent transactions. It provides essential information, including the last few transactions conducted over a specified period, enabling customers to track their expenditures without the need for detailed statements. Typically, a mini-statement displays the last five transactions, including deposits, withdrawals and balance updates. This service caters to customers who require quick access to their account information on the go.

    How to Check SBI Mini Statement via Missed Call Service

    SBI offers a user-friendly missed call service for customers to easily access their mini statements. Here’s how you can use this feature:

    1. Ensure that your mobile number is registered with your SBI account for which you need the mini statement. This service will only work with the registered mobile number.
    2. Call 9223866666 from your registered mobile number.
    3. The call will automatically disconnect.
    4. After the call, you will receive an SMS with your mini-statement details.

    The message will contain information about your recent transactions, including the last five transactions made in your account. This service is available 24/7. Ensure that your mobile balance is sufficient to send and receive messages.

    How to Check SBI Mini Statement via Net Banking

    SBI’s online banking portal allows customers to access their mini statements quickly and securely.

    1. Visit the SBI official website
    2. Log in using your username and password.
    3. Go to the Account Summary or Accounts section.
    4. Choose the specific account for which you want to see the mini statement.
    5. Look for the option labelled Mini Statement or Transaction History.
    6. Here, you can view a summary of your last five transactions.

    If needed, you can download the statement or print it for your records. Ensure you log out of your net banking session after use, especially when accessing your account from a public computer.

    How to Check SBI Mini Statement via the YONO App

    The YONO app is SBI’s mobile banking application designed to offer a range of banking services, including checking your mini statement.

    1. If you don’t have the app, download it from the Google Play Store or Apple App Store.
    2. Open the app and log in using your credentials.
    3. From the main dashboard, tap on the Accounts option.
    4. Choose the account for which you want to see the statement.
    5. Tap on Mini Statement to view your last five transactions.

    The YONO app also allows you to perform other banking services, such as transferring money, paying bills and more.

    How to Check SBI Mini Statement via Message

    For customers who prefer traditional methods, SBI also provides an SMS-based service to access mini statements.

    Send an SMS in the following format: ‘MIS (space) Account Number’ to the designated number, which is 9223866666.

    You will receive a message with details of your last five transactions. Ensure your mobile number is linked to your SBI account. You may incur standard SMS charges depending on your mobile plan.

    How to Check SBI Mini Statement via WhatsApp

    SBI has modernised its services, including the ability to access your mini statement via WhatsApp, making it even more accessible.

    1. Save the SBI WhatsApp banking number, which is 919022390229, in your phone contacts.
    2. Open WhatsApp and start a new chat with the saved number.
    3. Type ‘Mini Statement’ and send it.
    4. You will receive a reply containing the details of your last five transactions.

    This method is particularly convenient for users who frequently use WhatsApp for communication, allowing quick access to banking information without needing to switch apps.

    Frequently Asked Questions (FAQs)

    How can I get an SBI mini statement by missed call?

    To get an SBI mini statement through the missed call service, dial 9223866666 from your registered mobile number. You will receive an SMS with your last five transactions.

    How many transactions does the mini statement show?

    The SBI mini statement typically shows the last five transactions made in your account, including deposits, withdrawals, and balance updates.

    What is the limit of SBI mini account transactions per month?

    There is no specific limit on how many times you can check your mini statement or balance, whether through missed calls, SMS, net banking, or mobile apps. You can check it as often as you like.


    Source link

  • How to Delete Incognito Search History on Android, iOS, Windows, and Mac

    How to Delete Incognito Search History on Android, iOS, Windows, and Mac


    Incognito mode offers a sense of privacy while browsing the internet. Yet, contrary to popular belief, it doesn’t make your activities completely invisible. Many websites, apps and other platforms can see your activities. Among the data, search history, DNS queries or cached data might still be accessible in certain scenarios. Deleting incognito search history on different devices can enhance your privacy further. This guide explains the step-by-step process for Android, iOS, Windows, and Mac users to delete the incognito search history.

    What is Incognito Mode?

    Incognito mode, also known as private browsing, is a feature in most web browsers that prevents the storage of your browsing history, cookies, and site data. While it ensures your activity isn’t recorded locally on your device, it doesn’t offer complete anonymity. Your internet service provider, network administrators, and websites you visit can still track your activities. Understanding its limitations is essential to maintaining online privacy.

    How to Turn on Incognito Mode?

    Before we dive into how to delete your history, it is important to learn how to turn on the incognito mode. Enabling incognito mode is simple but. varies slightly depending on the browser or device you’re using. Here is how you can turn on incognito mode:

    For Chrome:

    • Open Chrome
    • Tap the three-dot menu in the top-right corner
    •  Select New Incognito Tab to browse privately

    For Safari:

           On iPhone or iPad

    • Open Safari.
    • Tap the tab switcher icon.
    • Select Private in the bottom-left corner and tap Done.

           On Mac:

    • Open Safari.
    • Go to the File menu.
    •  Select New Private Window.

    For Windows (Microsoft Edge):

    • Open Microsoft Edge.
    •  Click the three-dot menu in the top-right corner.
    •  Choose New InPrivate Window.

    How to Delete Incognito Search History on Android?

    While browsing in incognito mode on Android devices doesn’t save history directly in your browser, traces might still be stored in other areas like DNS cache or network logs. To ensure a thorough cleanup, follow these steps:

    Clear App Cache:

    • Go to Settings > Apps.
    • Select your browser (e.g., Chrome or Firefox).
    • Tap on Storage > Clear Cache.

    Clear Activity on Google Account:

    • Open the Google app or visit My Activity.
    • Tap on Delete activity by > Select Incognito activities > Confirm deletion.

    How to Delete Incognito Search History on iOS?

    Deleting traces of incognito activity on iPhones or iPads involves clearing browser data and addressing DNS cache. Here’s how:

    Clear Browser Data:

    For Safari

    1. Go to Settings
    2.  Go to Safari
    3. Select Clear History and Website Data.

    For Chrome

    1. Open Chrome
    2. Tap the three-dot menu
    3. Go to Settings
    4. Select Privacy
    5. Click Clear Browsing Data.

    Flush DNS Cache

    • Open the Settings app.
    • Toggle Airplane Mode on and off, or restart your device to refresh the DNS cache.

    Review App Permissions

    • Check any apps linked to your browsing activity to ensure no logs are stored.

    How to Delete Incognito Search History on Windows?

    Even while using incognito mode, your browsing data can leave traces in temporary files or DNS caches. To delete incognito history on Windows:

    Flush DNS Cache:

    • Open the Command Prompt (as Administrator).
    • Type ipconfig /flushdns and press enter.

    Delete Temporary Files:

    • Press Win + R, type %temp%, and hit enter.
    • Select all files and delete them.

    Clear Browser Data:

    For Chrome

    1. Go to Settings
    2. Select Privacy and Security
    3. Click on Clear Browsing Data
    4. Choose “All Time”
    5. And then Clear.

    For Edge

    1. Navigate to Settings
    2. Go to Privacy, Search and Services
    3. Click on Clear Browsing Data.

    How to Delete Incognito Search History on Mac?

    To clear incognito search history on macOS, focus on clearing browser data and DNS cache. Follow these steps:

    Flush DNS Cache:

    • Open the Terminal app.
    • Type sudo dscacheutil -flushcache; sudo killall -HUP mDNSResponder and press enter.

    Clear Browser Data:

    For Safari

    1. Go to Safari
    2. Then Preferences
    3. Click on Privacy
    4. Go to Manage Website Data
    5. Select Remove all.

    For Chrome

    1. Open Chrome
    2. Click the three-dot menu
    3. Go to Settings
    4. Click on Privacy
    5. Select Clear Browsing Data.

    Frequently Asked Questions (FAQs)

    What des deleting incognito history do?

    Deleting incognito history clears temporary files, DNS logs, and cached data that might have been generated during your browsing session. It reduces the chances of third parties accessing residual data.

    Can deleted incognito history be seen?

    In some cases, yes. Network administrators, ISPs, or individuals with access to forensic tools might retrieve browsing logs. Deleting history makes access harder but not impossible.

    Can anyone see my history after I delete it?

    While deleting history removes visible traces from your device, external records (e.g., ISP logs) might still exist. Using encryption tools, such as VPNs, can help minimise exposure.

    Can anyone recover incognito history?

    Sophisticated recovery tools can sometimes retrieve deleted data. However, thorough deletion methods, combined with encryption tools, can significantly lower the risk of recovery.


    Source link

  • How to Check EPF Balance Online Using Different Methods?

    How to Check EPF Balance Online Using Different Methods?


    Managing your Employees’ Provident Fund (EPF) balance has become easier than ever with many digital methods at your access. Employees in India can check their EPF balance through various methods, including the official EPFO website, the UMANG app, SMS services, and even missed calls. This article will guide you through these methods, providing step-by-step instructions on how to access your EPF balance efficiently. Understanding your EPF balance is crucial for effective financial planning and ensuring a secure retirement, making it essential for every employee to stay informed.

    How to Check EPF Balance Online Using EPFO Website

    To check your EPF balance through the official Employees’ Provident Fund Organisation (EPFO) website, follow these steps:

    1. Go to www.epfindia.gov.in.
    2. From the homepage, click on the ‘Services’ dropdown menu.
    3. Choose the ‘For Employees’ option.
    4. Click on ‘Member Passbook’ from the services menu. This will redirect you to the login page.
    5. Enter your Universal Account Number (UAN) and password, then complete the CAPTCHA verification.
    6. Once logged in, select your member ID from the list of accounts linked to your UAN. Your passbook will be displayed, showing your current EPF balance.

    Important Points to Remember

    • UAN Activation: Ensure your UAN is activated and linked to your mobile number. Without an activated UAN, you cannot access the passbook.
    • Update Delays: Changes made on the UAN portal may take up to six hours to reflect on the EPFO website.
    • Account Activity: Only members who are actively contributing can view their passbook. Accounts that have not seen contributions for over three years become inoperative and require reactivation for access.

    How to Check EPF Balance Using the UMANG App

    The UMANG app provides a convenient way to check your EPF balance directly from your smartphone. Here’s how:

    1. Download the UMANG App from the Google Play Store or Apple App Store.
    2. Open the app and register using your mobile number linked with your UAN.
    3. Use the search bar to find ‘EPFO’.
    4. Under EPFO services, choose ‘View Passbook’.
    5. Enter Your UAN and log in.
    6. An OTP will be sent to your registered mobile number; enter this OTP to access your passbook.
    7. Your EPF balance will be displayed along with other account details.

    Key Considerations

    • Mobile Number Registration: Ensure that the mobile number used for registration is linked with your UAN for successful verification.
    • Error Resolution: If you encounter errors, verify that your mobile number is correctly linked with your UAN and try again.

    How to Check EPF Balance by Sending SMS

    If you prefer a quick method without internet access, you can check your EPF balance via SMS:

    1. Send an SMS in the format EPFOHO UAN to 7738299899.
    2. You will receive a response with details about your current EPF balance in English.

    Points to remember

    • Registered Mobile Number: This service is only available if the SMS is sent from a mobile number registered with your UAN.
    • Real-Time Updates: The balance details are updated in real time, ensuring accurate information.

    How to Check EPF Balance Without UAN Number

    If you do not have access to your UAN, you can still check your balance using a missed call service:

    Check EPF Balance Via Missed Call

    1. Give a Missed Call to 9966044425 from your registered mobile number.
    2. After a missed call, you will receive an SMS with details about your EPF balance.

    Limitations

    • This method requires that you have a registered mobile number linked with your UAN.

    FAQs

    How many times can we withdraw PF advance in a year?

    Employees can withdraw advances from their Provident Fund account up to three times in a financial year. However, this is subject to specific conditions such as:
    ● Medical emergencies
    ● Home purchase or construction
    ● Higher education expenses
    Ensure that you meet the eligibility criteria for each withdrawal type before proceeding.

    How do you check how much money I can withdraw?

    To determine how much money you can withdraw from your EPF account:

    1. Log into the EPFO portal or app using your UAN.
    2. Navigate to the withdrawal options section.
    3. Alternatively, consult with your HR department for personalised assistance.

    Can You Check EPF Balance Without a UAN Number?

    While the UAN is crucial for accessing detailed account information, you can still check your EPF balance using the missed call or SMS methods. Ensure that your mobile number is registered with your EPF account to use these services.

    What Should You Do if Your Mobile Number is Not Linked to Your UAN?

    If your mobile number is not linked to your UAN, you can update it by logging into the EPFO portal and following these steps:

    1. Go to the UAN Member e-Sewa portal.
    2. Login using your UAN and password.
    3. Navigate to the ‘Manage’ section and select ‘Contact Details.’
    4. Update your mobile number and save the changes.

    What Happens to an Inactive EPF Account?

    An EPF account becomes inactive if there are no contributions for over three years. To reactivate an account, contact your employer or the EPFO office and complete the necessary formalities.

    Are There Any Charges for Using These Services?

    All the methods mentioned above, including website access, the UMANG app, SMS, and missed calls, are free of cost. However, standard SMS charges may apply as per your mobile network provider.


    For the latest tech news and reviews, follow Gadgets 360 on X, Facebook, WhatsApp, Threads and Google News. For the latest videos on gadgets and tech, subscribe to our YouTube channel. If you want to know everything about top influencers, follow our in-house Who’sThat360 on Instagram and YouTube.


    Crypto Price Today: Bitcoin Trades at $92,000, Most Altcoins See Losses on Last Day of 2024


    12,000-Year-Old Wolf Remains in Alaska Show Early Signs of Human Interaction


    Source link

  • Print Preview Shortcut Key: What is it and How to Use it in MS Excel, Word and PDFs

    Print Preview Shortcut Key: What is it and How to Use it in MS Excel, Word and PDFs


    Print Preview is a valuable tool that allows users to view how a document will appear when printed, ensuring accuracy in layout, formatting and content. By offering a visual representation before committing to print, it helps avoid errors, saves time and reduces waste. Accessible through shortcut keys like Ctrl + P, it enables quick adjustments to settings such as orientation, margins and copies. This feature enhances efficiency across various applications like Excel, Word and PDF viewers. Here is a guide that will help you with using this tool in MS Excel, Word and PDFs.

    What is the Print Preview Shortcut Key?

    The Print Preview Shortcut Key is a keyboard command that allows users to view how a document will look when printed, without actually printing it. This feature is crucial for ensuring that the layout, formatting and overall appearance of the document are correct before printing, potentially saving time and resources.

    Print Preview Shortcut Key for Microsoft Excel

    In Microsoft Excel, the primary shortcut key to access Print Preview is Ctrl + F2. This command directly opens the print preview window, displaying how the spreadsheet will appear when printed. Users can navigate through different pages of the document in this view and make necessary adjustments before finalising the print job.

    Steps to Use Print Preview in Excel:

    1. Open Microsoft Excel on your device and open the spreadsheet you wish to print.
    2. Before proceeding, ensure your work is saved to avoid losing any changes. Use the shortcut Ctrl + S to save your document quickly.
    3. Press Ctrl + F2 on your keyboard. This will open the print dialogue box with a preview of how your spreadsheet will look when printed.
    4. In the print preview window, you can see how your document will appear on paper. Take note of any formatting issues or areas that need adjustment.
    5. If your spreadsheet contains multiple pages, use the arrows at the bottom of the preview window to scroll through each page. You can also type a page number in the box and hit Enter to jump to that specific page.
    6. In the print preview interface, modify settings such as:
      • Number of Copies: In the Copies box, specify how many copies you want to print.
      • Page Orientation: Choose between portrait and landscape orientation based on your content layout.
      • Scaling Options: Adjust scaling settings if necessary to fit your content properly on the printed page.
      • Print Area Selection: If you only want to print a specific section of your spreadsheet, select that area first, then set it as the print area under the Page Layout tab.

    Print Preview Shortcut Key for Microsoft Word

    In Microsoft Word, users can access the print preview feature using the same shortcut key as Excel: Ctrl + P. This command opens a dialogue box that includes both printing options and a visual representation of how the document will appear once printed.

    Steps to Use Print Preview in Word:

    1. Open Microsoft Word and open the document you want to print.
    2. Use Ctrl + S to save any changes made to your document.
    3. Access print preview by pressing Ctrl + F2 on your keyboard, which opens the print dialogue box with a preview of your document.
    4. The right side of the print dialogue displays how each page will look when printed. Pay attention to formatting, images and text alignment.
    5. Use the zoom options available in the print preview window for a closer look at specific sections of your document.
    6. If you find errors or formatting issues during preview:
      • Close the print dialogue and return to editing mode.
      • Make necessary adjustments (e.g., fixing typos, adjusting margins).
      • Repeat steps 3-6 after making changes.

    Print Preview Shortcut Key for PDF File

    When working with PDF files, whether in Adobe Acrobat Reader or other PDF viewers, this function allows users to see how their PDF document will look when printed before committing to paper.

    Steps to Use Print Preview in PDF Files:

    1. Launch Adobe Acrobat Reader or any other PDF viewer installed on your device.
    2. Open the PDF file that you wish to review before printing.
    3. Press Alt + P, which opens up a print dialogue that includes a preview of how your document will appear when printed.
    4. Open Preview Mode where the right side of this dialog shows how each page of your PDF will look when printed. Ensure all elements are visible and correctly formatted.
    5. If there are issues with how elements appear in preview mode (like text being cut off)

    Close out of printing mode and make adjustments in a PDF editor if needed (this may require additional software).


    For the latest tech news and reviews, follow Gadgets 360 on X, Facebook, WhatsApp, Threads and Google News. For the latest videos on gadgets and tech, subscribe to our YouTube channel. If you want to know everything about top influencers, follow our in-house Who’sThat360 on Instagram and YouTube.


    Huawei Enjoy 70X Launch Date Announced, Spotted on China Telecom Website With Price, Specifications


    Honor Tablet X9 Pro With 11.5-Inch 2K LCD Screen, 8,300mAh Battery Launched: Price, Specifications


    Source link